Monstera adansonii, often called Swiss Cheese plant or Monkey Mask plant, is a popular tropical houseplant. Its main feature is its unique and attractive foliage and its ability to climb poles or drape in long, elegant tendrils.
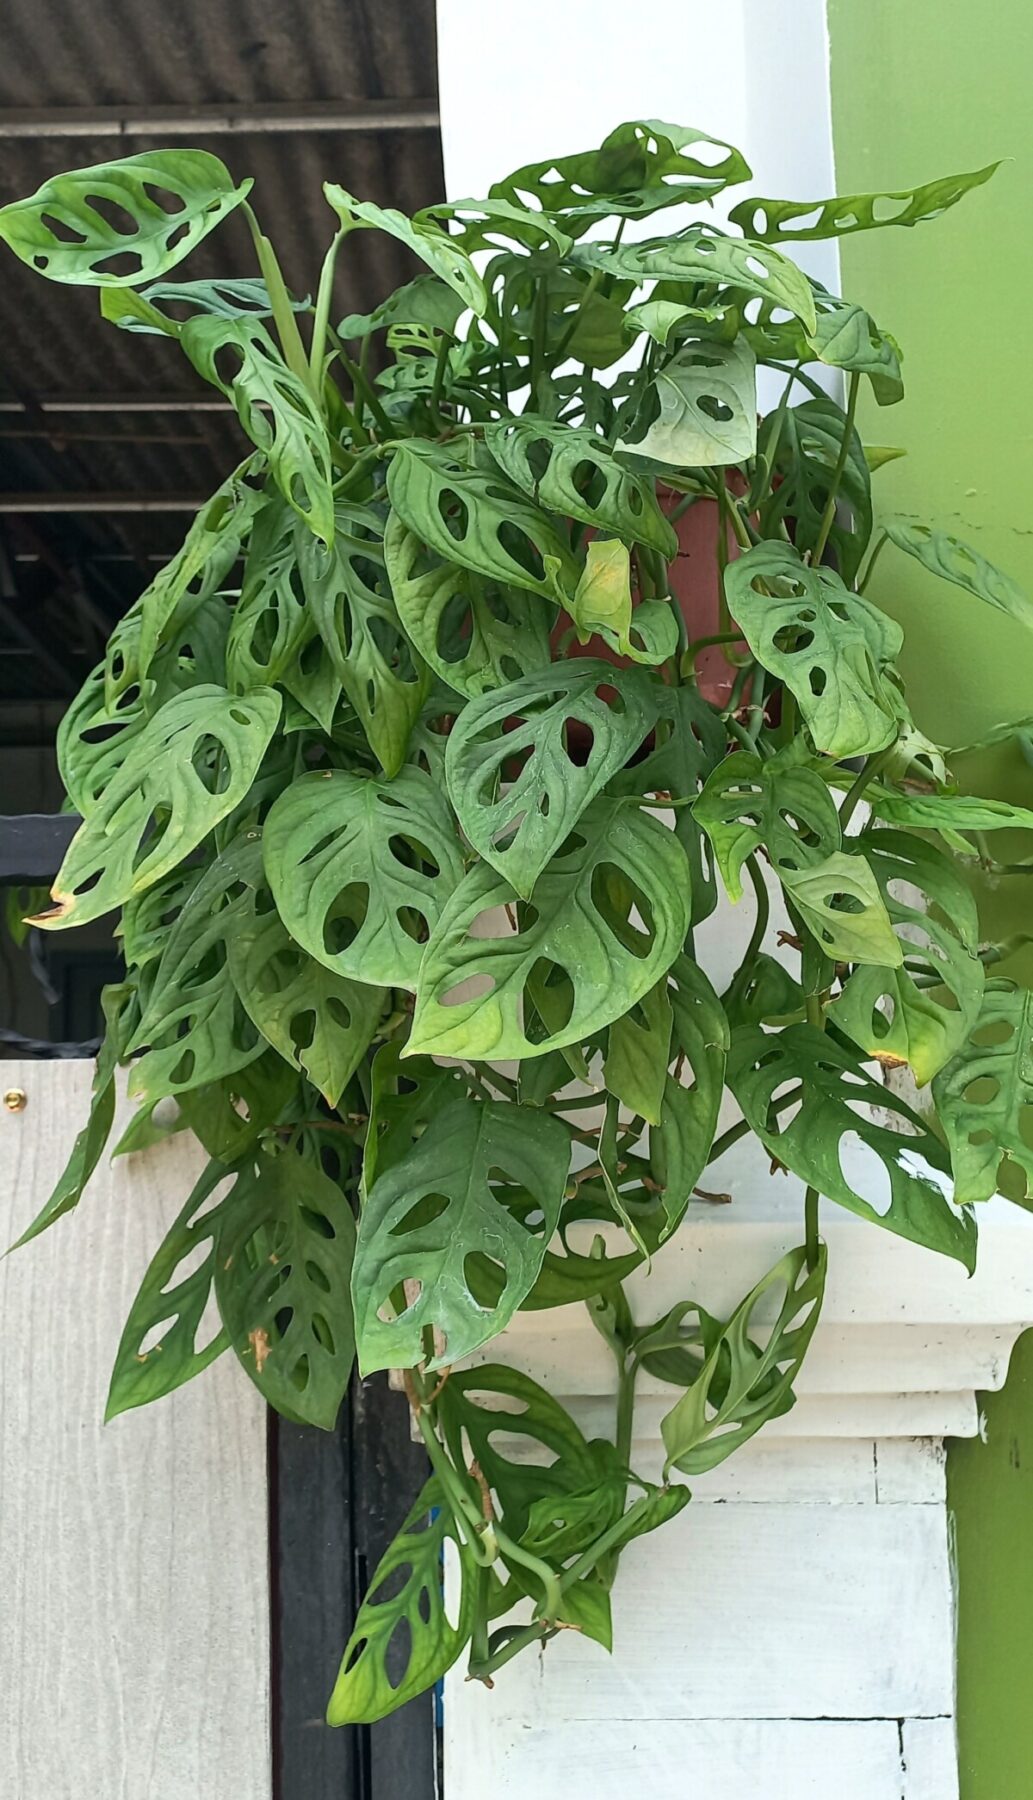
As the leaves mature, they grow larger and develop a pattern of holes, called fenestrations, hence the “Swiss Cheese plant” name.
Monstera adansonii plant care is relatively straightforward and easy, which is another reason it’s so popular. You can grow them in hanging baskets or climbing on trellises or poles. So, it’s a very versatile addition to your plant collection.
Many people think you just can’t have enough tropical foliage in your houseplant collection, and I can’t argue with that. The good news is that you won’t have to worry about buying more Monstera, because they’re incredibly easy to propagate.
Understanding How to Propagate Monstera adansonii
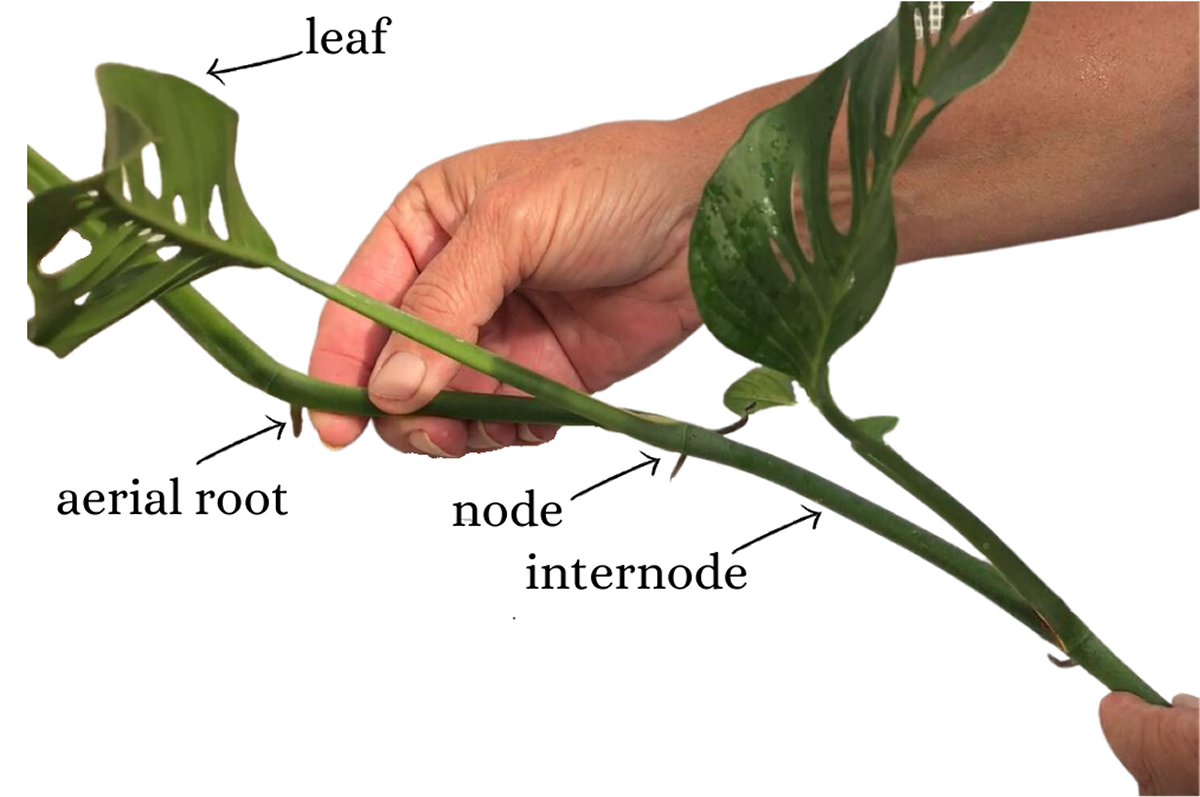
To propagate Monstera adansonii successfully, it helps to understand the main parts of the plant. That way, you’ll feel more confident navigating your way through the process.
Stems
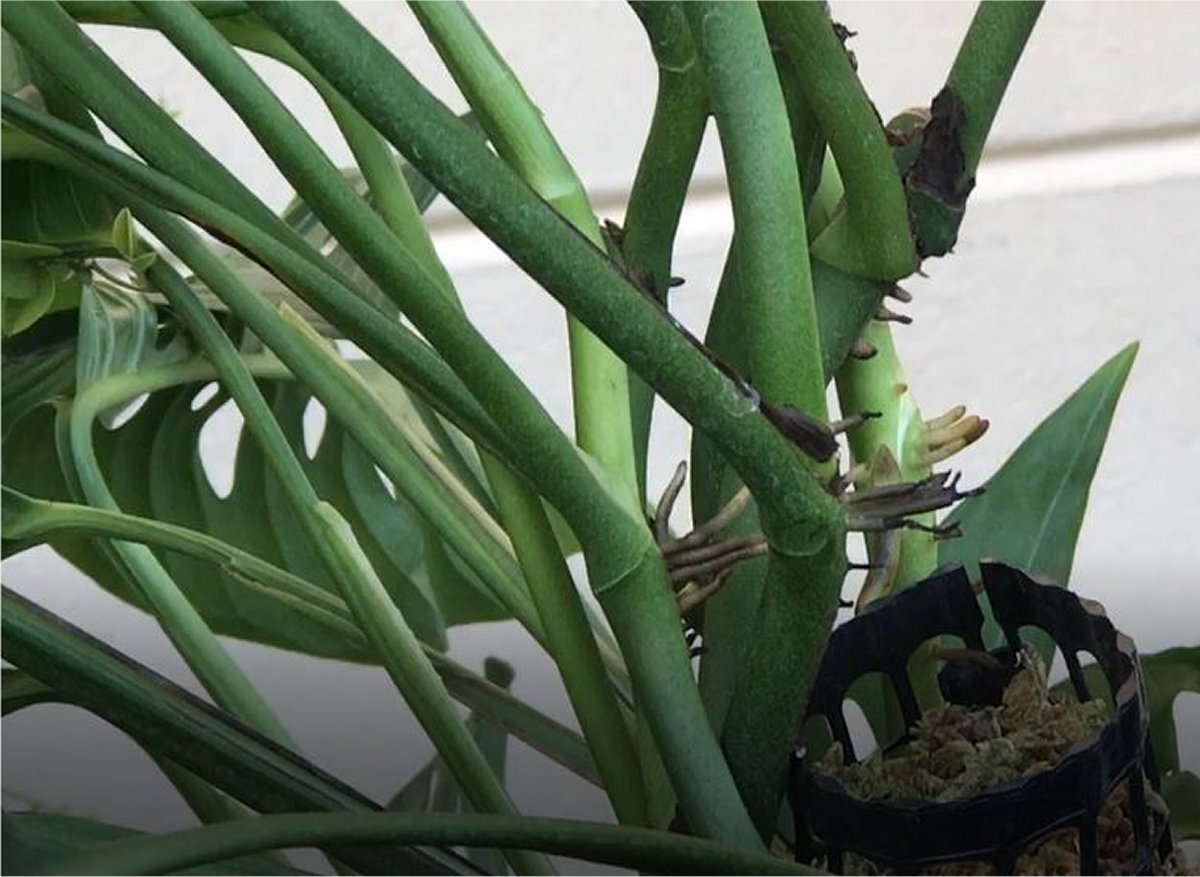
The plant has vine-like stems that become woody with age. They can grow quite long in their quest for more sunlight.
Leaves
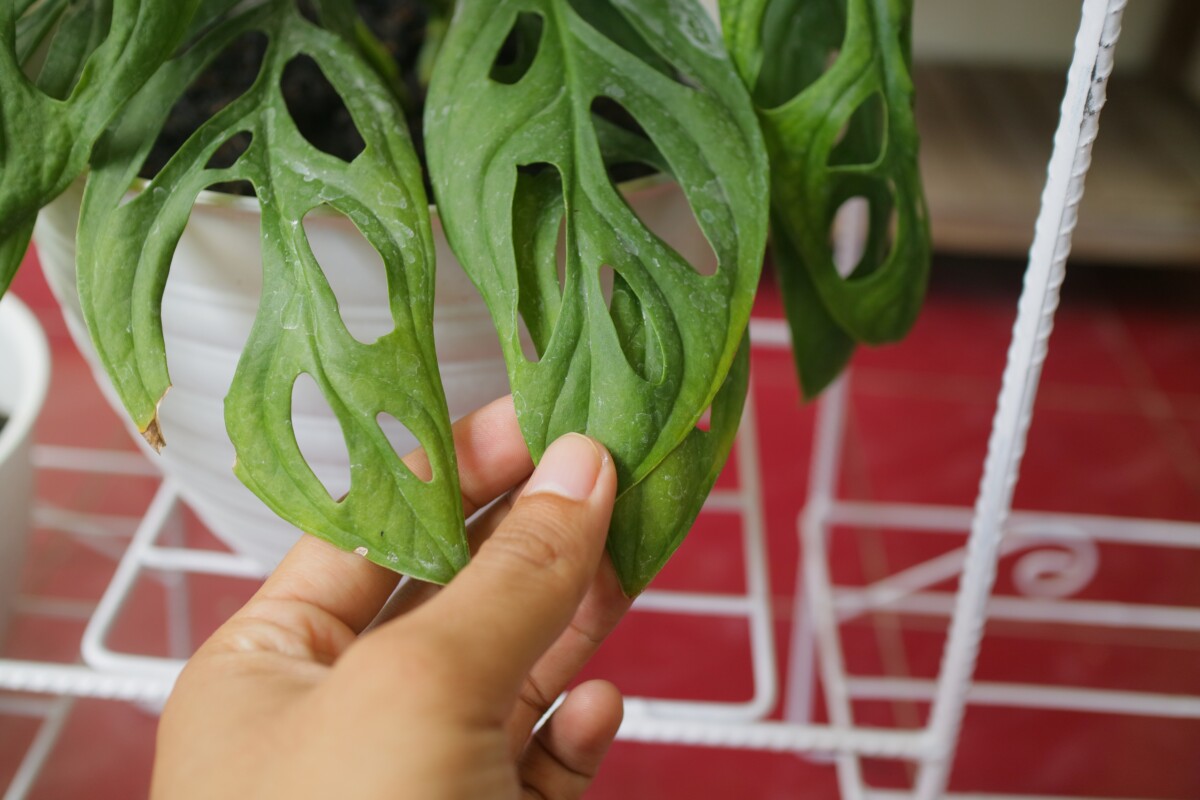
The leaves are one of the most distinctive features of the Monstera adansonii. They’re oval or heart-shaped, depending on the specific variety. They develop fenestrations, or holes, between the midribs and the margins, in between leaf veins.
Nodes
Nodes, sometimes called “leaf nodes” are the bumpy points along a plant stem that produce new branches, leaves, or flowers.
These nodes contain “meristematic cells,” or actively dividing cells, that produce growth in plants. You’ll find them on the growing tips (apical meristems) and in these bumps along stems (lateral or axillary meristems).
Internodes
This is the length of the stem between two nodes.
Aerial Roots
Monstera adansonii produces aerial roots along its stem. These roots help the plant attach itself to trees in its native habitat.
Inflorescence
Monstera adansonii flower, producing a flower spike, or inflorescence. This spike carries its flowers, which aren’t particularly showy. Swiss Cheese plants rarely flower when grown indoors, however.
Roots
The plant has a root system that anchors it in the soil or growing medium. Proper care of the roots is crucial for the plant’s health and growth.
Monstera Adansonii Propagation
There are several ways to propagate Monstera adansonii, and the best method depends on the state of the mother plant, the tools you have at hand, and the environment you have to work with.
You can propagate Monstera adansonii from smaller stem cuttings in water, rooting medium, or potting soil. If you find yourself with a cutting with no leaves, you can also grow a new plant as long as it has a node.
Monstera will also propagate through air-layering.
Taking Monstera adansonii Cuttings
To propagate Monstera adansonii, you’ll first need to take cuttings.
Supplies needed:
- A healthy mother plant
- Pruning shears, snips, or knife
- Alcohol or other disinfectant
- Rooting hormone
- Clean water
- Paper towels
- Plastic bag
Choose a healthy section on your plant that has several nodes along the stem. Take cuttings that include at least one node, although two nodes are better.
If you have long, unruly vines to trim, you can cut them all at once and then divide them into smaller sections afterward.
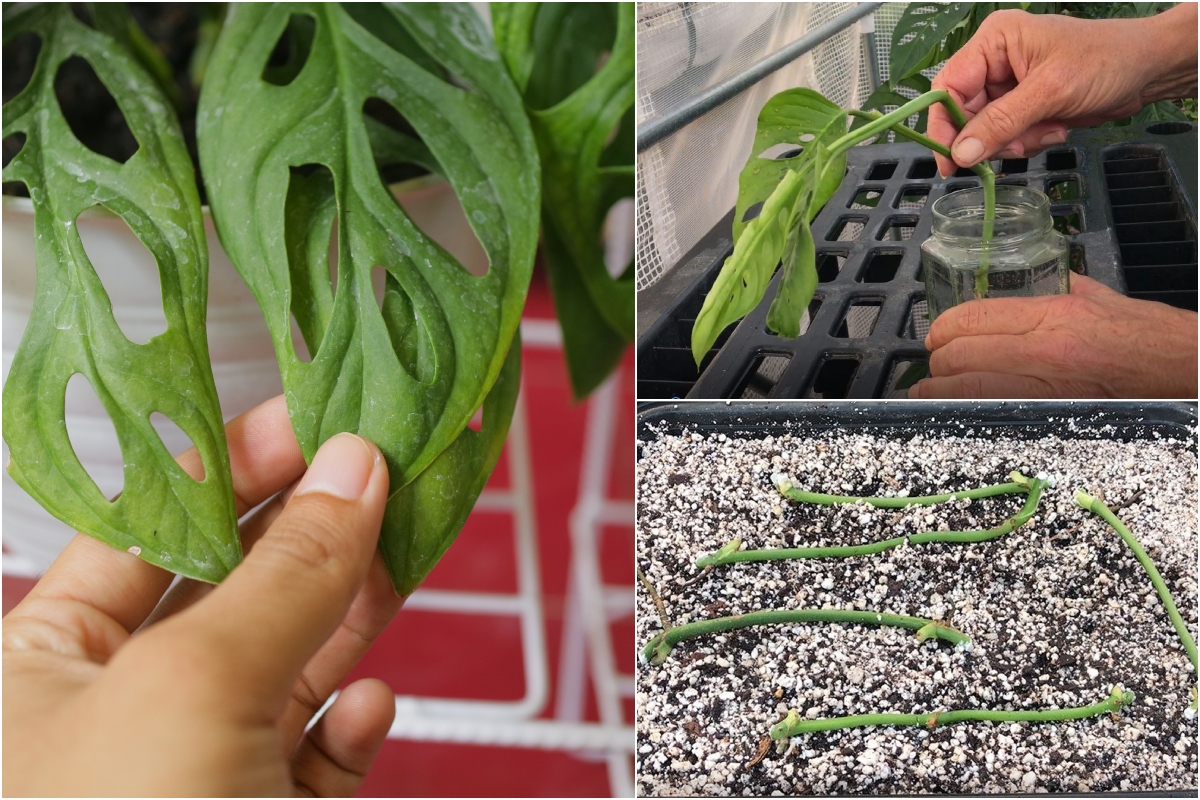
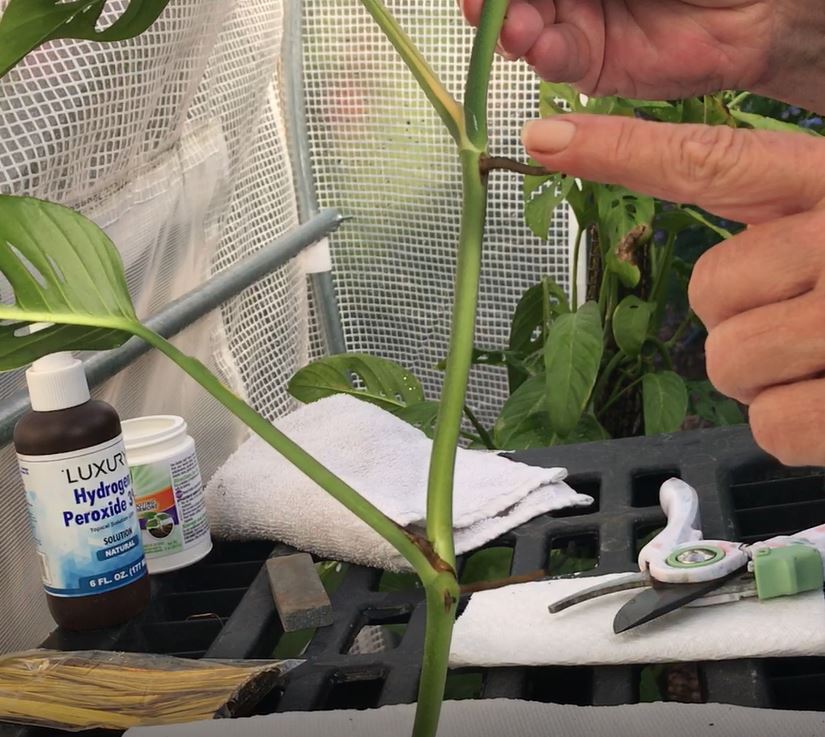
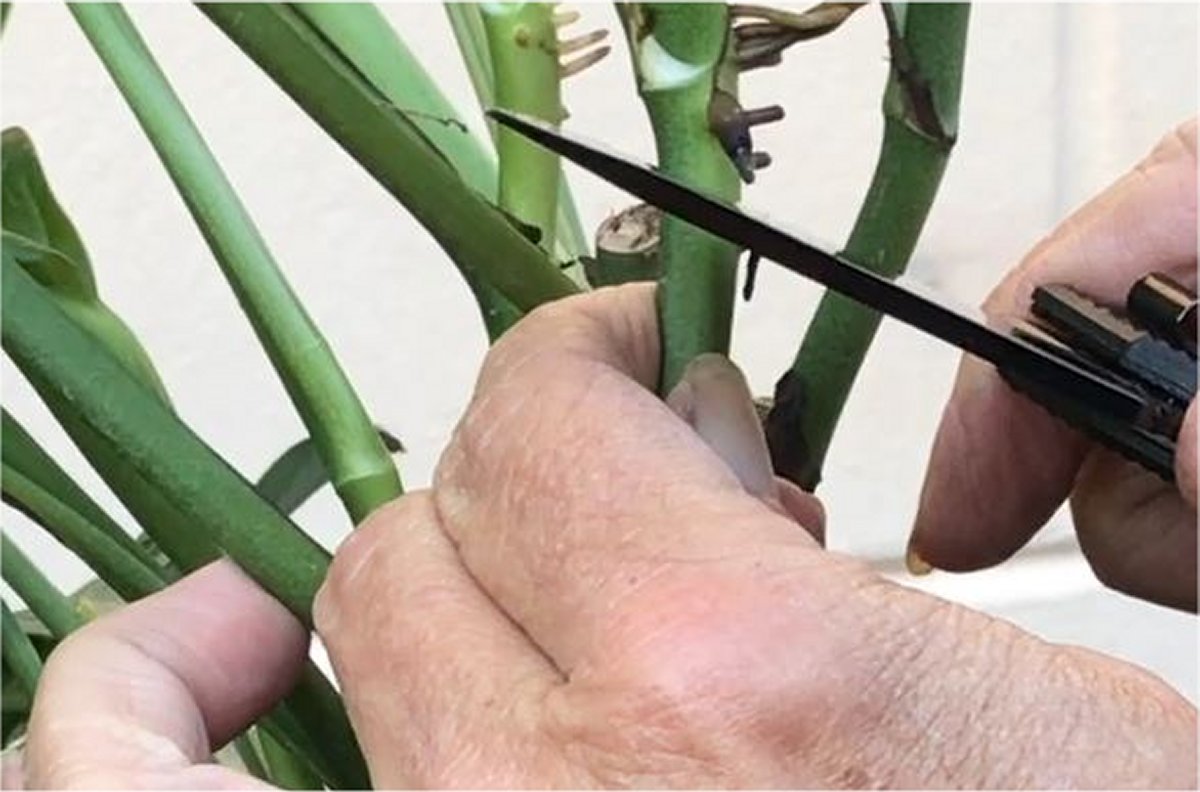
1. Sterilize your shears, snips, or knife with alcohol and make a clean, quick cut just below a node.
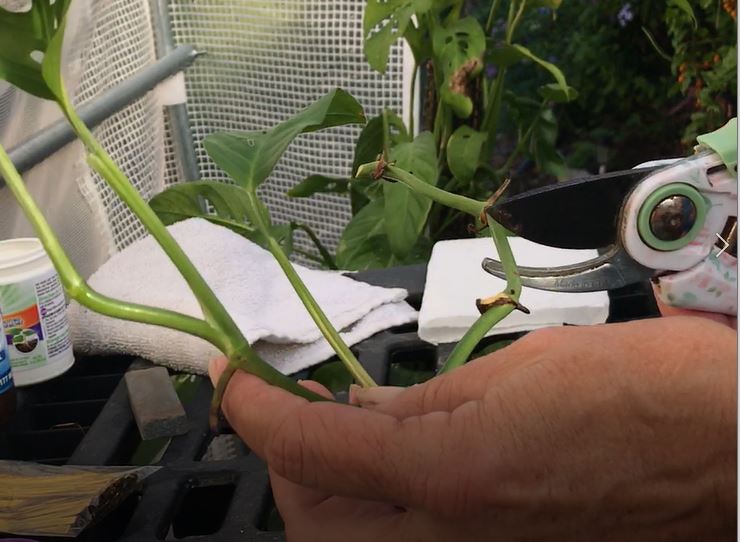
2. Section your cuttings. If working with long sections, ensure that each cutting has at least two nodes. Use a flat cut at the top of the stem and a slanted cut at the bottom to help differentiate them.
3. Remove excess leaves from each cutting, leaving only one or two leaves at the top.
4. Apply rooting hormone. I prefer powdered rooting hormone because it’s easy to see where it’s been applied. Dip the cutting ends into the powder and remove excess by tapping the stem to shake it off.
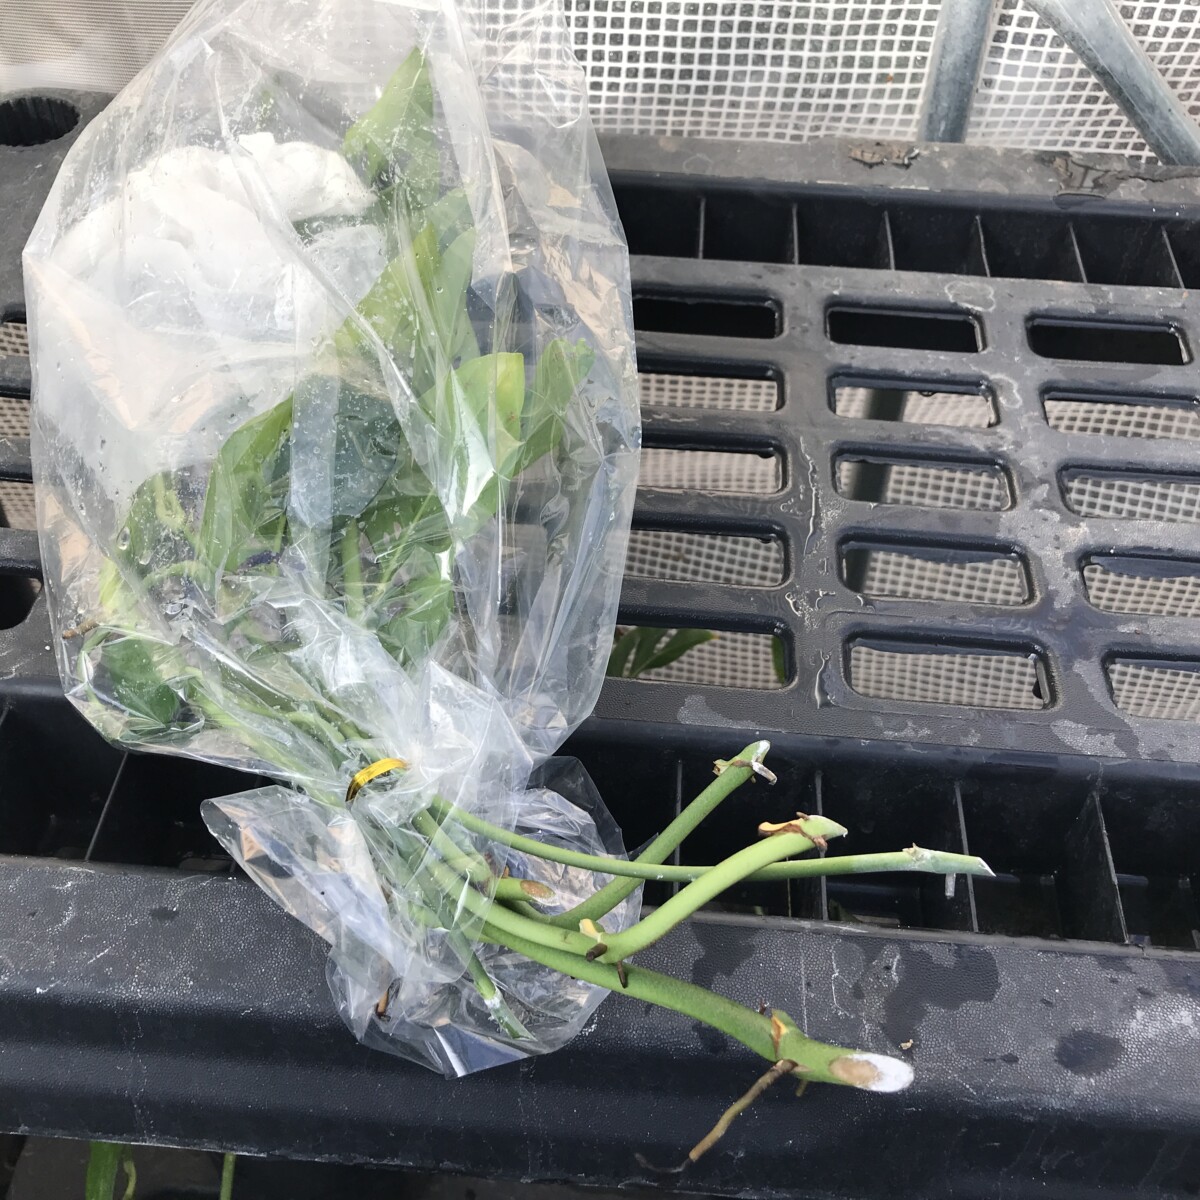
5. Allow the cuttings to callus. After taking the cutting, place the leaf ends of your cuttings inside the plastic bag. Dampen a paper towel with water and add it to the bag.
Allow the cut ends of the cuttings to extend outside the bag. Close the bag around the stems to prevent moisture loss and allow your Monstera cuttings to callus in a warm, well-lit location over the next two to three days.
Allowing plant cuttings to callus results in improved success when growing plants from cuttings.
How to Propagate Monstera adansonii in water
Many people like propagating their houseplants in clear water glasses. It’s fun to watch as they develop little roots.
The problem with this method is that it doesn’t encourage the growth of fine root hairs, which are needed to absorb nutrients.
However, if you’re interested in growing a smaller plant in water for the aesthetic, rooting your Monstera this way is fast and easy. However, if you decide to pot it up in soil later, be prepared for some transplant stress.
Once your cuttings are callused, place them in their water container. You can propagate more than one cutting per container but try not to crowd them.
Make sure at least one node is submerged. The rest of the cutting should be above the waterline, especially the leaves.
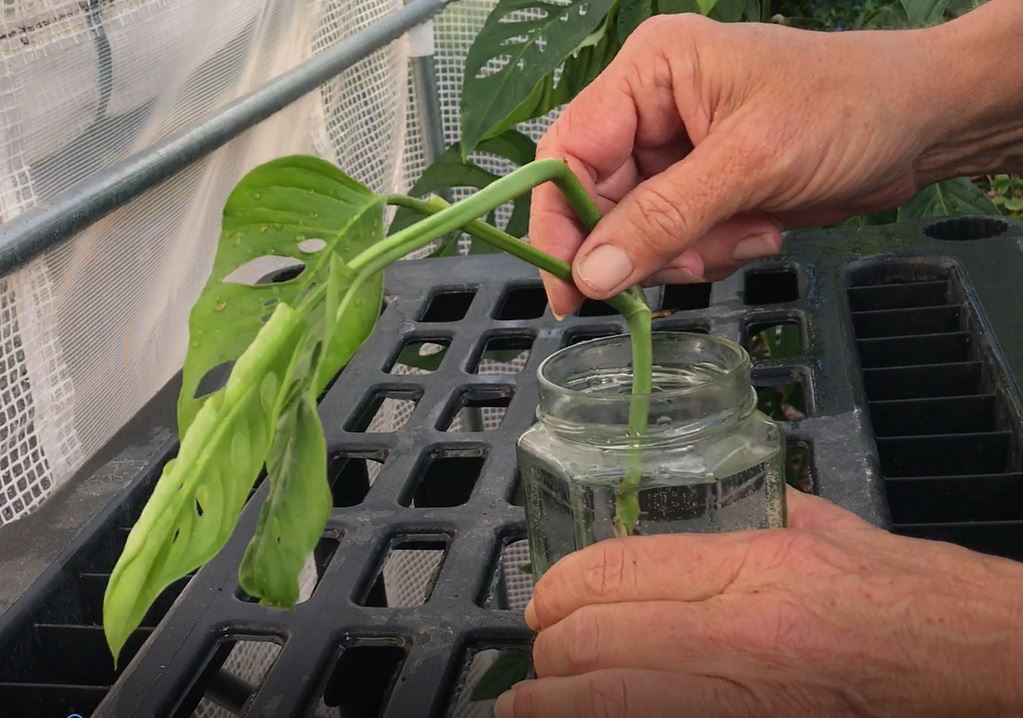
Place the glass or jar in a warm location with bright, indirect light. Look for areas of the home that offer high humidity but avoid direct sun, as it can overheat the water and scorch the leaves.
While mature Monstera can tolerate temperatures down to 50°F (10°C), they will root best between 70°F to 85°F (20°C to 30°C).
Change the water once a week to keep it clean and fresh. If you’re propagating more than one cutting per container, you may need to change it more frequently.
Root bud development can take two to four weeks. This time frame can vary, but eventually, you’ll see tiny roots growing from the node submerged in water.
Propagating Monstera adansonii in Rooting Medium or Potting Soil
I use a soil-less medium, or “sticking mix” for most tropical houseplants. I’m peat-free, so I combine one part coconut coir with one part coarse perlite.
A soil-less mix is a compromise between the ease of water-rooting and the root-growth benefits of using soil.
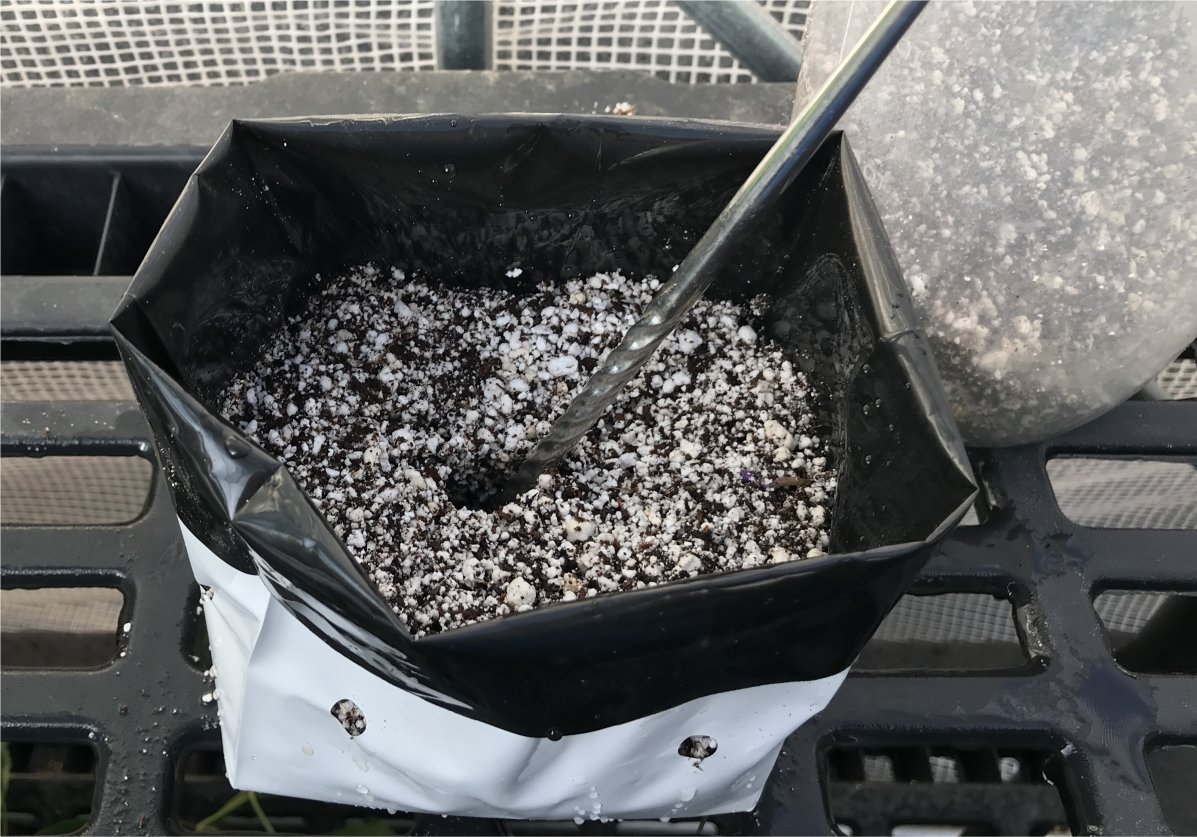
To propagate Monstera, choose a pot with very good drainage and fill it with your choice of potting soil or rooting mix. Water the pot deeply, saturating the soil well.
You can select one small pot for each cutting or place them around the edges of the pot rim to increase exposure to ambient warmth.
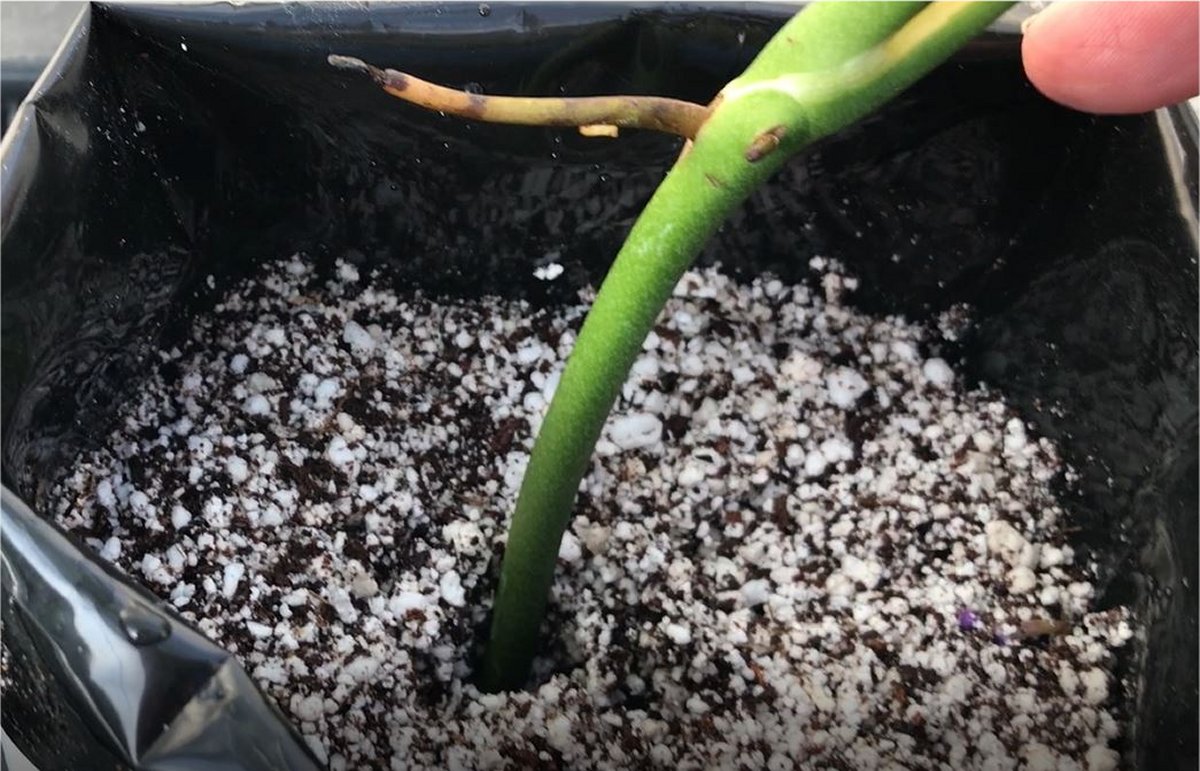
Make a small hole in the mix with a dibbler or chopstick, and then insert the cut end of the cutting.
Firm the soil around the cutting, ensuring that at least one node is covered with the mix. Pat the mix gently around the cutting to secure it in place. Water the pot well again to settle the mix around the cuttings.
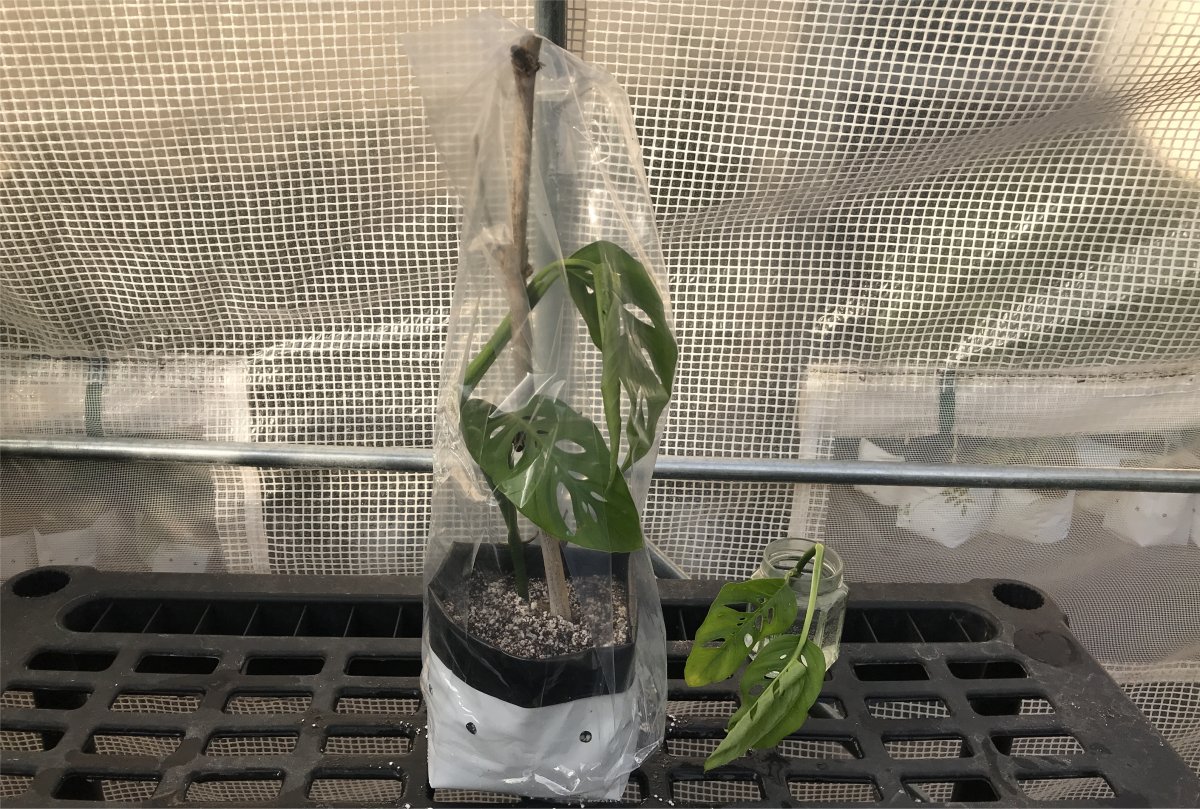
Cover the pot with a plastic bag or cloche to create a mini-greenhouse effect, which helps maintain humidity around the cutting.
Then, place the pot somewhere warm (70°F to 85°F, or 20°C to 30°C) with bright, indirect light. Don’t place it in full sun, or the cutting may become scorched or overheated.
Aftercare for cuttings
If you don’t use a cover to maintain humidity, you’ll need to mist your cuttings several times a day. This keeps the cuttings hydrated until they can form roots.
If you are using a plastic bag or other humidity dome, give your cuttings some fresh air once every other day to prevent the growth of bacteria and mold.
Check your cuttings regularly for rooting. You won’t be able to see them growing, but you can test their progress with a gentle tug. Resistance means they are forming roots, but don’t pull too hard.
Once you see new growth at the top of the cuttings, you’ll know rooting is complete. If there is more than one cutting per container, this is a sign it’s time to separate them into their own containers.
How to Propagate Monstera adansonii Without Leaves
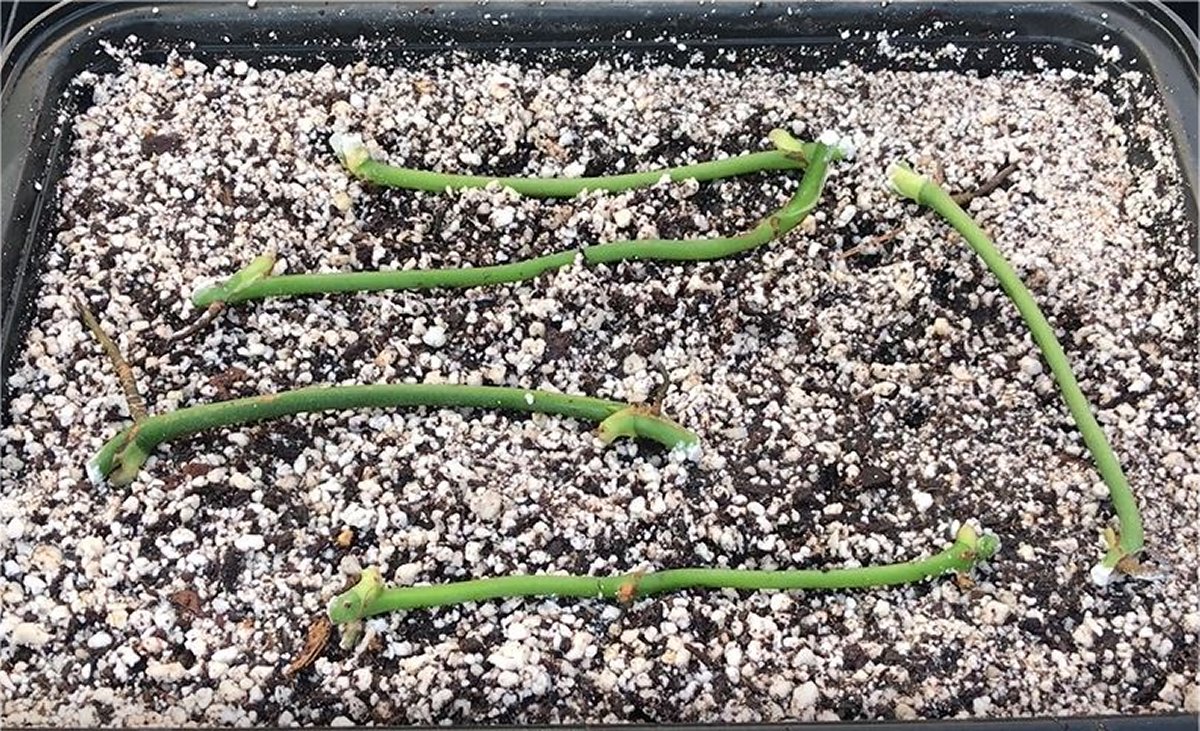
It’s possible to start new Monstera plants from stem cuttings with no leaves. You’ll need to make sure that your stems contain at least one node, although two is better.
Find a shallow plant pot that has adequate drainage holes and fill it with potting soil or soil-less medium.
Water the soil well, saturating it, and ensuring that the container drains well.
Lay your plant stem down on the soil, ensuring that the nodes have good close contact. You can pin them down using floral wire or a bobby pin. You can also bury the stem lightly with soil.
Mist the stems and soil well. To increase humidity, place the container inside of a plastic bag or cover it with a transparent plastic bowl.
Place the cuttings in a warm place with bright, indirect light. Keep the cuttings moist, misting them frequently and airing them out as necessary.
It may take them longer than cuttings with leaves to root, but in a few months’ time, you should see tiny leaves developing from the nodes. Roots will have grown below.
Wait several months for full development before transplanting them carefully into a more suitable container.
How to Propagate Monstera adansonii Using Air Layering
Air layering is a more advanced technique to propagate Monstera adansonii. Air layering has a few pros and a few cons.
The advantage of air-layering is that it’s nearly 100% effective — if done correctly. You don’t have to fully remove the cutting from the mother plant until it has developed roots, which improves its chances of survival.
It’s also a better method for really large vines and branches. In fact, it’s a popular method for propagating fruit trees.
The downside is that it can take quite a while, up to six to eight months, to produce a plantable cutting.
However, if you have a mature Swiss Cheese plant and want to take substantially sized cuttings, air layering is the way to go.
To air-layer your Monstera adansonii plant, you’ll need a few additional tools and supplies.
Supplies for air layering:
- Sphagnum moss
- Bowl of clean water
- Plastic wrap / Cling film
- String or twine
- Sharp knife
- Alcohol
- Rooting hormone
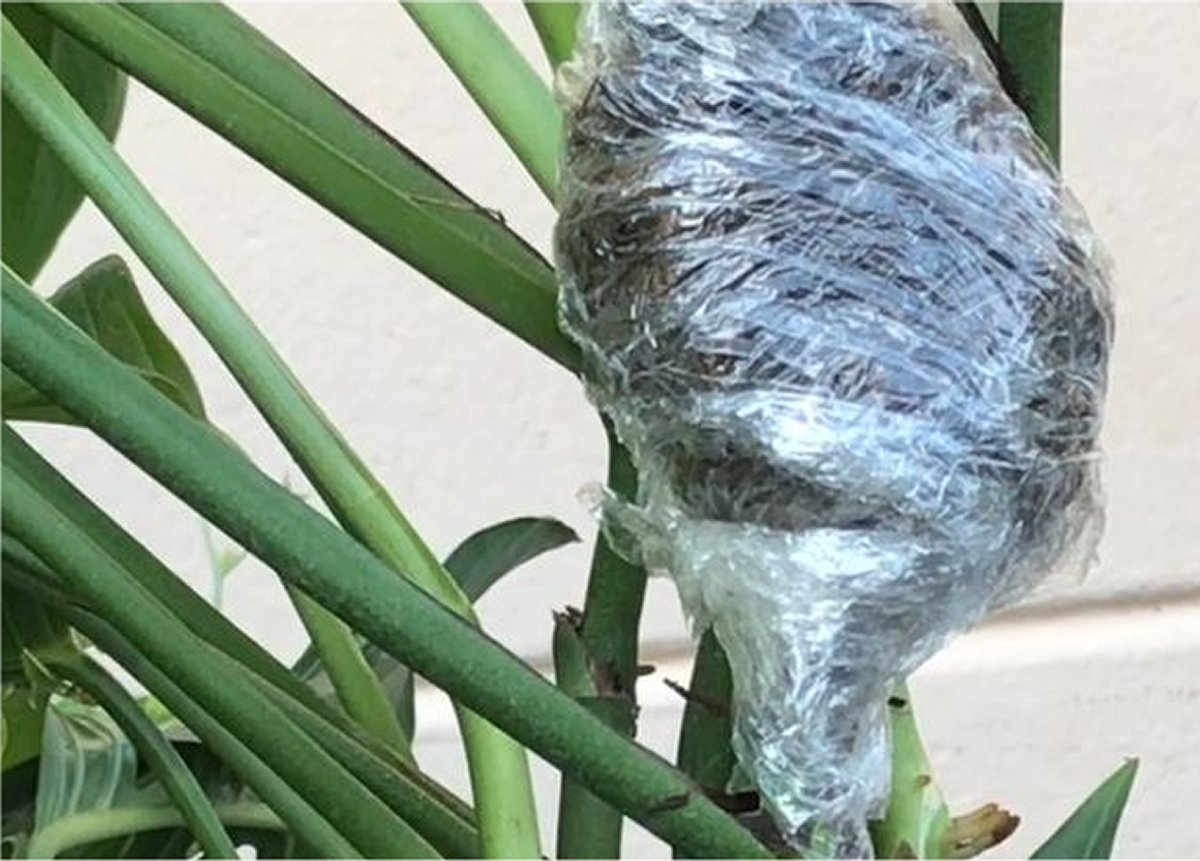
To air-layer your Monstera:
- Place a handful of sphagnum moss in the bowl of water to soak.
- Sterilize your knife.
- Find a healthy stem on your plant.
- Look for a section that offers at least two nodes.
- Locate the spot just below the bottom node.
- Make a sharp cut about halfway through the stem, below the node.
- Dab some rooting hormone powder onto the cut and into the wound.
- Gently wring out the moss and wrap it completely around the wound in the stem.
- Cover the moss firmly with plastic wrap.
- Tie the plastic wrap into place with string if necessary.
Monitor the status of your plant over the coming weeks to ensure the moss stays moist and hasn’t slipped.
Check it over the coming months. You should be able to eventually see roots through the plastic film.
Once roots have completely populated the moss bundle, it’s time to cut the new plant away from the mother plant. Place it into its own pot filled with potting medium.
Water the pot thoroughly and allow the plant to recover in a dimly lit place for several days. After two or three days, gradually accustom it to more brightly lit conditions.
Making New Monstera
Propagating any variety of Monstera is easy and rewarding. It’s also a great way to fill out those gaps in your indoor jungle with beautiful and unique tropical foliage.
The method you choose is up to you and the tools you have to use. But be mindful of your mother plant’s health and resiliency. Don’t try to trim her so much she suffers. I’ve made that mistake myself and ended up with a plant barely hanging on. It’s particularly heartbreaking when the cuttings fail to strike.
However, if you start with a healthy, full mother plant, propagating Monstera adansonii offers an inexpensive way to expand your plant collection, as well as priceless education in plant development.