
My stubborn attempt to overfill my garden with more plants on a shoestring budget continues throughout the rest of fall. Or at least for as long as the weather allows it.
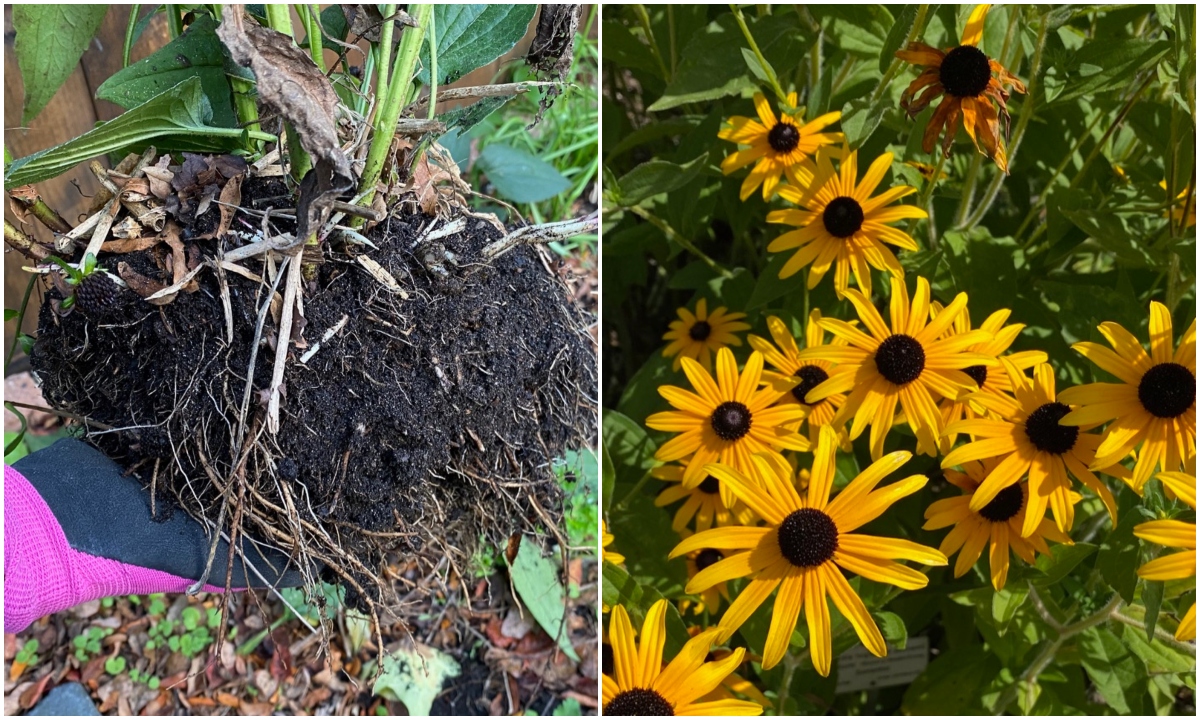
One of the tasks I accomplished this week was to lift, divide and transplant my black-eyed Susan (Rudbeckia).
But how is that frugal if I already have the plant? Well, it took me about fifteen minutes to turn one plant into two. Three plants, actually, because I discovered a bonus baby rudbeckia that I’ll tell you about later.
If you’re also thinking of dividing your black-eyed Susan, read on. I’ll share a few of my tips and the reasoning behind some of the choices I made while I was transplanting this belle.
What’s the best time to divide black-eyed Susan?
You can divide black-eyed Susan either in the fall or in the spring when the plant is entering or exiting dormancy. You shouldn’t divide it in the summer when the plant is actively growing, nor in the winter when the plant is already dormant. In general, rudbeckia should be divided every three or four years.
Even though my rudbeckia had only been in this spot for less than two years, I decided to lift, divide and transplant it to two other beds in my yard. Initially, I wanted this sunk bed to be spring bulbs and summer perennials, with a few perennial herbs such as hardy sage and savory thrown in for good measure.
But this summer, I chucked in some leftover tomato plants in this bed and they grew like weeds. They did much better here than in any other spot in my garden.
This sealed the deal for next year, so I decided to give this bed to tomatoes and other pollinator-friendly annual plants. (The spring bulbs will be staying since they don’t overlap with tomato season. And the herbs are also staying because they grow low to the ground).
Should I prune black-eyed Susan before dividing it?
Pruning perennials before dividing them makes it easier to maneuver them; it’s also especially helpful when you’re dealing with tall, bushy plants. Once planted in their new location, the foliage of an unpruned plant will also look floppy, so aesthetics is also a consideration of whether you should prune or not.
I chose to experiment with both pruning and not pruning my rudbeckia. So I left one of my divisions intact because the seed heads add texture and height to the garden in the winter; they also attract birds that like to feed on the seeds. I pruned the other plant because I wanted to harvest the seeds. I’m planning on trying to grow rudbeckia from seeds next spring.
I had been cutting rudbeckia blooms all throughout the summer to create posies for indoor arrangements, so there weren’t that many seedheads left. This slow and steady deadheading encouraged the plant to stay in full bloom for more than two months.
How do I divide black-eyed Susan?
I like to think of dividing black-eyed Susan (and by extension, most perennial root divisions) as a four-step process: prep, lift, divide, replant.
Step 1: Prep the new planting site first.
If you’re planning on replanting your rudbeckia (or parts of it) in another spot in your garden, start by prepping this new site first. Trust me, it’s easier this way. Later, you’ll have your hands full, quite literally.
So dig the hole (you’ll want to bury your black-eyed Susan at the same depth) and amend it with fresh compost. Rudbeckia can tolerate drought, but it does not do well in soggy soil. So make sure the new location is draining well. This perennial is not an aggressive spreader, so don’t be afraid to tuck it in close to other plants.
Step 2: Lift the black-eyed Susan.
Whether your soil is rock solid or just clay-heavy, you can give your rudbeckia a good watering beforehand in order to make it easier to dislodge. My garden was already quite wet from the rain, so I didn’t pre-soak the roots.
Black-eyed Susan has a clumping root structure – it doesn’t go very deep, but it does stay very compact. The easiest way to lift it is by digging a trench around the drip line of the plant (the imaginary circle right below the outer edge of the foliage). This method will give you good leverage for lifting and will ensure that you get the entire root structure in one go.
Once you’ve dug around the roots, hold on to the stems with one hand and use a spade to lift from below with your other hand. I was able to do this with a hand shovel, but if your rudbeckia is larger, you might need a full-sized shovel to get the job done.
When I lifted the large black-eyed Susan, I was thrilled to find a baby plant right next to it. This bonus baby was hidden behind the mother-plant, but still connected at the roots. I decided to leave this one in place, so I just cut through the root that was connecting it to the large rudbeckia.
Step 3: Divide the root clump.
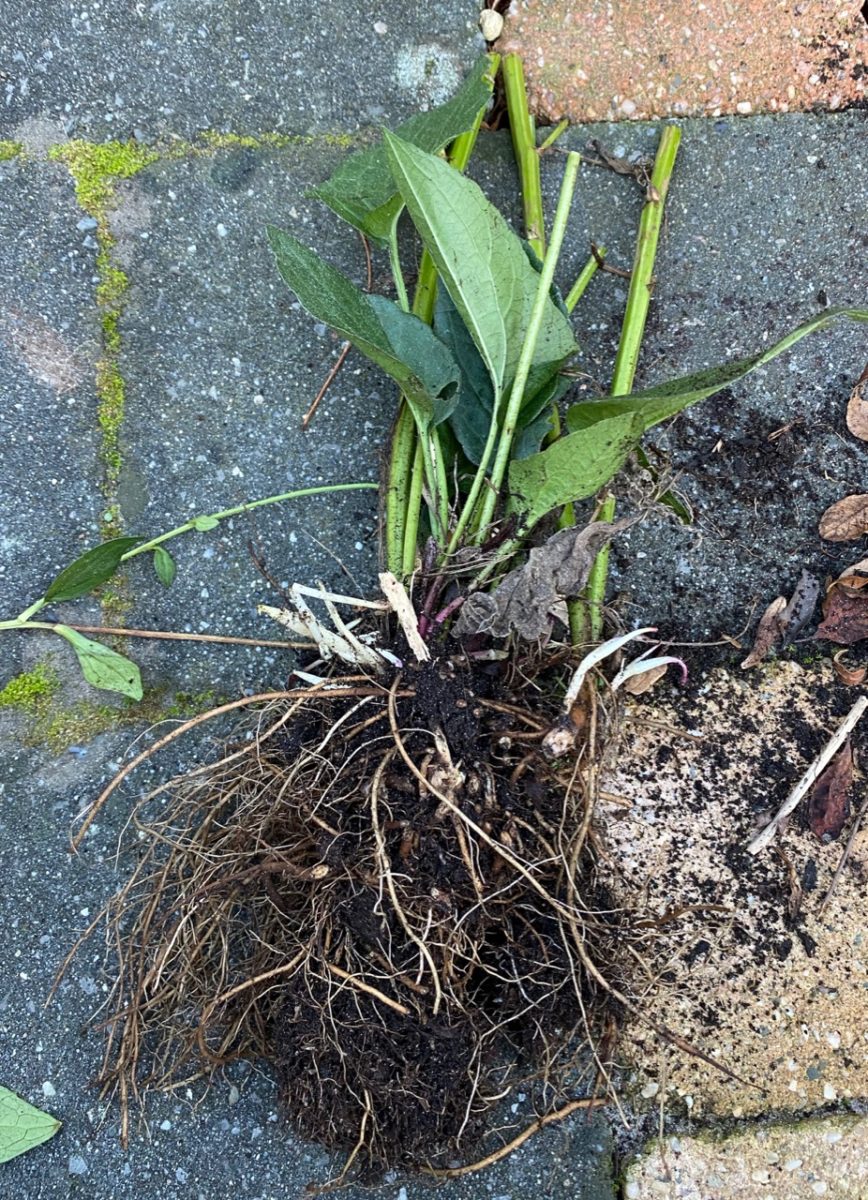
At this point, you’re probably looking at a large ball of tangled roots and dirt. Inspect it from all sides and see if the plant naturally divides somewhere close to the middle (or in however many parts you want to divide it). If it doesn’t, choose a spot where you would like to sever it.
I started by removing some of the soil in order to make the root structure more visible.
Then I used my regular secateurs to cut straight through the roots. You can also use larger pruning shears if you’re cutting through a larger root structure. I divided the black-eyed Susan into roughly two equal parts.
In my case, neither of the two plants will go back into the old planting hole. So I filled that back up.
Some gardeners simply leave the plant in the ground after digging the trench and sever the roots in place using a shovel. I prefer to lift and divide using scissors because a clean cut is better for the root structure than a tattered division.
Step 4: Transplant (or replant) your black-eyed Susan.
If you’re keeping one of the new divisions in the same location, make sure you bury it again at the same depth. Black-eyed Susans don’t send out a taproot and they don’t need to be buried too deeply.
A good gardening rule of thumb that works well for me is to put in what I take out when dividing and transplanting plants.
That means that whatever soil or roots I’ve taken out will be replaced by fresh compost. This helps keep the soil surface even (without any dips and valleys). It also helps ensure the transplants are off to a good start.
So if there are gaps in the soil after you’ve taken out a big clump, always fill them back up with garden compost.
Where should I transplant my black-eyed Susan?
Always transplant your black-eyed Susan in full sun, in a spot that gets at least six to eight hours of sunlight in the middle of summer. Rudbeckia is also prone to powdery mildew, so it’s better to plant it in a spot that gets plenty of airflow.
You’ll also want to keep it away from prolonged overhead moisture. This is the kind that you get if you place your plant under the house eaves, leaky gutters or the drip line of a tree.
Finish any transplanting session with a good dose of water. This will help the roots bounce back after being disturbed and it will help the soil settle.
If you’ve mastered the (very easy) art of dividing a black-eyed Susan, you’re now well-equipped to divide a host of other perennials with the same root structure. Division is a really easy way to get more plants for free.
Have a look at the other easy method to get free garden plants: taking hardwood cuttings.